Add A Host (Cloud Or Standalone)
Hosts are added from Servers -> Add New Host. 
Server Runtime
Every host runs one of two Quake Live server runtimes, chosen from the Server Runtime radio buttons on the Add Host form, right below Provider:
- minqlx — the original runtime, and every plugin QLSM ships today. Provisions/expects Debian 12.
- minqlxtended — a hard fork with no plugin compatibility with minqlx. Provisions/expects Ubuntu 24.04, and requires Python 3.12 or newer on the target machine.
Neither option is pre-selected. QLSM will not make this choice for you: it is permanent, so the form refuses to submit until you pick one and shows Server runtime is required. if you try. Each option has an ⓘ tooltip with a one-line description, what it means for the provider you have selected, and a link to that runtime's GitHub repository.
For Vultr cloud hosts, QLSM provisions the matching OS image automatically — there's no separate OS choice.
For standalone hosts, the target machine's OS is auto-detected during connection testing, and creating a minqlxtended host additionally requires the detected Python to already be 3.12 or newer — the Add Host form rejects the submission with an explanation if it isn't.
For a self host, there's no equivalent inline check: QLSM has no way to detect the local machine's Python version before creating the host record. The form accepts the submission, the host is created, and setup runs in the background — if the machine's Python turns out to be older than 3.12, setup fails and the host lands in Error status instead of Active. If you're creating a minqlxtended self host, confirm python3 --version is 3.12 or newer on that machine yourself before you submit the form.
This choice is permanent. There is no setting to change it later. Moving a host to the other runtime means saving a preset from the existing host and deploying a brand-new host with the other runtime selected.
Presets carry across runtimes. A preset saved from a minqlx instance can be loaded onto a minqlxtended host, and vice versa: your server config, map pool, and other settings come across intact, while plugins that can't run on the target runtime are removed — with a replacement offered where one exists — before you confirm the load. See Presets And Default Config for the details.
Self-Host Deployment
The QLSM Host (self) provider runs game servers on the same machine that runs the QLSM Docker stack. Useful when you already have a spare Linux box and don't want a separate VM just for game servers.
- Set Provider to
QLSM Host (self). - The form shows the detected OS, pre-fills the inferred SSH user, and may pre-fill Server address if
QLSM_HOST_IPis configured. Verify these values before continuing. - Set Timezone.
- Click
Add Hostbutton to submit the form. - Wait until setup finishes and host is Active.
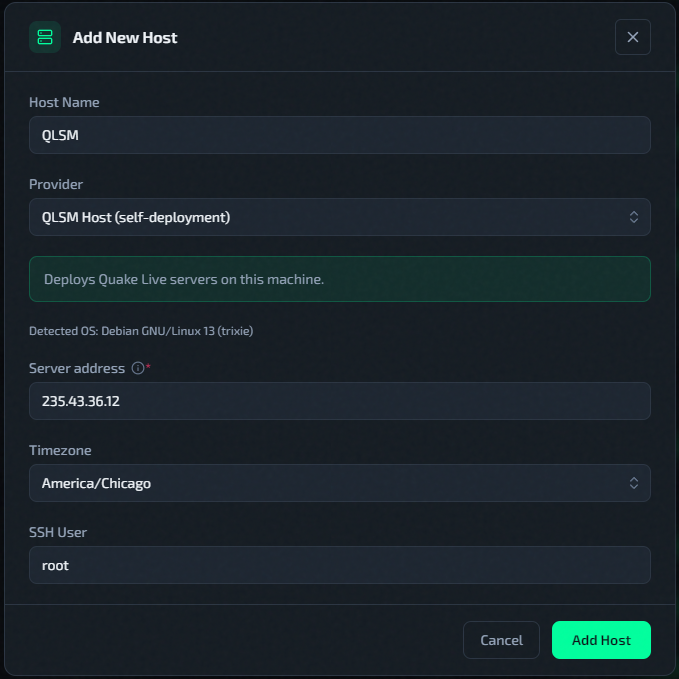
QLSM generates and manages its own SSH key for self-host automation. Your personal SSH keys are never accessed.
For self-host setup, the SSH user can be root or another account with passwordless sudo privileges. QLSM uses that account as the management login for automation tasks.
During setup, QLSM creates a dedicated ql system user for Quake Live files and services. Game server assets and processes run under ql, but QLSM continues to connect as the configured management account when it needs to automate the host later.
Only one QLSM Host (self) deployment may exist at a time.
Standalone Workflow
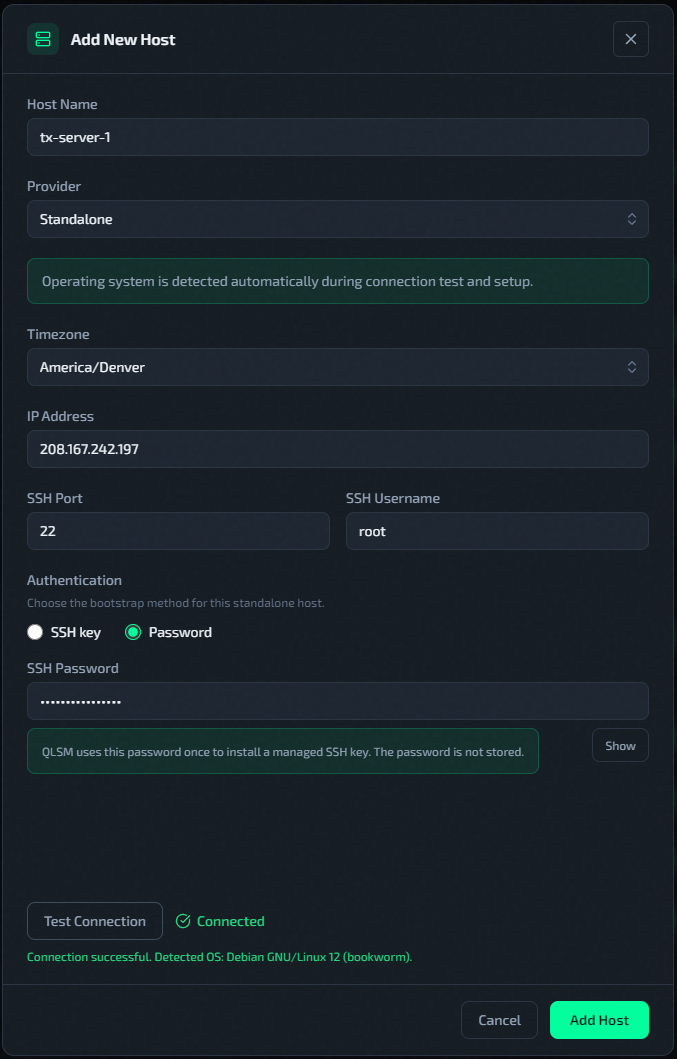
- Set Provider to
Standalone. - Fill:
- Host Name
- IP Address
- SSH Port
- SSH Username
- SSH Private Key (or password for bootstrap — QLSM installs a managed key then discards the password)
- Timezone
- Run Test Connection and confirm it shows Connected. OS is auto-detected during the connection test.
- Click
Add Hostbutton to submit the form. - Wait until setup finishes and host is Active.
Vultr Cloud Deployment
Prerequisites
Create a Vultr API key by following Vultr's official guide: Create New API Key. Copy and store the key immediately because Vultr only shows it once.
Set VULTR_API_KEY in the QLSM environment before using Vultr provisioning.
One-liner install — pass the key inline:
VULTR_API_KEY=your_vultr_api_key bash <(curl -fsSL https://raw.githubusercontent.com/dngrtech/qlsm/main/qlsm-install.sh)
Git clone / manual install — edit .env before starting:
Then start with docker compose up -d.
You can also set or change the Vultr API key later without editing .env, from Settings → Vultr API Key. A key saved there takes precedence over .env and travels with a global backup.
One-line install example with both a domain and Vultr provisioning:
SITE_ADDRESS=qlsm.example.com VULTR_API_KEY=your_vultr_api_key bash <(curl -fsSL https://raw.githubusercontent.com/dngrtech/qlsm/main/qlsm-install.sh)
Workflow
- Set Provider to
VULTRcloud provider. - Select Continent, Region, and Machine Size / Plan.
- Click
Add Hostbutton to submit the form. - Wait until host status reaches Active.
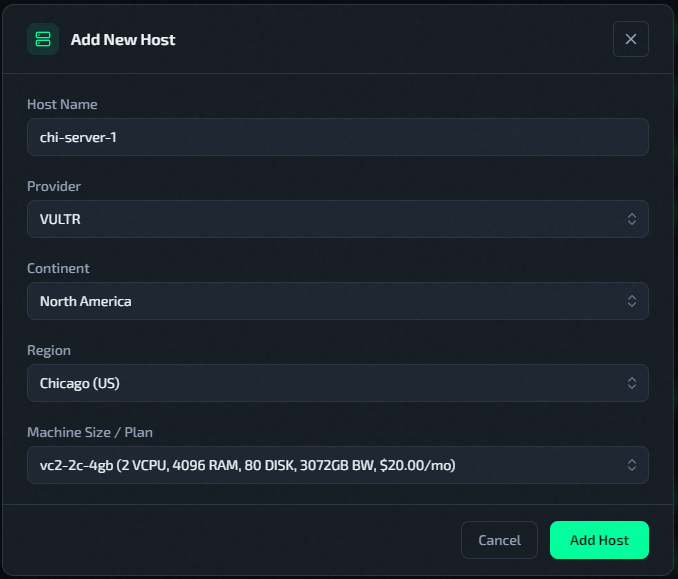
Cloud hosts inherit timezone from selected region. That timezone is later used by Configure Auto-Restart.
Timezone Requirement
Timezone is operational, not cosmetic.
- Configure Auto-Restart executes in host local timezone.
- Wrong timezone means restart at the wrong local hour.
- Wrong restart time delays Workshop item refresh on running servers.
Continue with: Configure Auto-Restart